Установка образа tib на виртуальную машину
Вместо преобразования TIB-файла в файл виртуального диска, что требует дополнительных действий для начала работы с виртуальным диском, Acronis Backup & Recovery 11 производит преобразование путем восстановления резервной копии диска на полностью настроенную и работающую новую виртуальную машину. Во время настройки операции восстановления можно адаптировать конфигурацию виртуальной машины к требованиям ситуации.
С помощью агента Acronis Backup & Recovery 11 для Windows резервную копию диска (тома) можно восстановить на новую виртуальную машину любого из следующих типов: VMware Workstation, Microsoft Virtual PC, Parallels Workstation, открытое виртуальное устройство (OVA) Citrix XenServer или Red Hat KVM.
Файлы новой виртуальной машины будут помещены в папку по выбору. Можно запустить машину с помощью соответствующего программного обеспечения виртуализации или подготовить файлы машины к дальнейшему использованию. Открытое виртуальное устройство Citrix XenServer (OVA) можно импортировать в XenServer с помощью Citrix XenCenter. Файлы виртуальной машины KVM можно перенести на машину с ОС Linux; отсюда можно запустить эту виртуальную машину с помощью диспетчера виртуальной машины. Виртуальную машину VMware Workstation можно преобразовать в открытый формат виртуализации (OVF) с помощью средства VMware OVF.
С помощью агента Acronis Backup & Recovery 11 для Hyper-V или агента для ESX(i) можно восстановить резервную копию диска (тома) на новую виртуальную машину на соответствующем сервере виртуализации.
Совет. Microsoft Virtual PC не поддерживает диски размером более 127 ГБ. С помощью Acronis можно создать машину Virtual PC с дисками большего размера, чтобы подключить диски к виртуальной машине Microsoft Hyper-V.
Как преобразовать резервную копию диска в виртуальную машину
Машины одного и того же типа с одинаковым именем нельзя создавать в одной папке. Смените имя ВМ или путь к ней, если появляется сообщение об ошибке, вызванной совпадением имен.
В Microsoft Virtual PC следует обязательно восстанавливать диск или том с загрузчиком операционной системы на жесткий диск 1. В противном случае операционная система не загрузится. Смена порядка устройств загрузки в BIOS не решит проблему, поскольку система Virtual PC не учитывает эти параметры.
Полученная в результате машина всегда располагает интерфейсом диска SCSI и базовыми томами MBR. Если машина использует пользовательский загрузчик, возможно, придется указать загрузчику новые устройства и повторно активировать загрузчик. Настройка GRUB описана в разделе «Как повторно активировать загрузчик GRUB и изменить его конфигурацию».
Совет. Если нужно сохранить логические тома (LVM) на машине Linux, следует рассмотреть возможность альтернативного метода преобразования. Создайте новую виртуальную машину, загрузите ее с загрузочного носителя и выполните восстановление так же, как на физической машине. Структура LVM может быть автоматически воссоздана в ходе восстановления.
Установка образа tib на виртуальную машину

Сталкивались ли вы с желанием использования системы, копию которой вы сделали при помощи Acronis’a, в виртуальной машине? Бывает случаи, когда полностью уничтожать текущую систему, не всегда представляется удобным. А файл с образом системы упорно не хочет монтироваться ни в одну виртуальную машину.
Выход есть, чтобы смонтировать образ Acronis’a в виртуальную машину вам понадобится:
У вас уже есть образ или несколько его частей в формате .tib, который и содержит необходимый вам снимок системы. Установите Acronis True Image, версию для работы в системе, а не загрузочную! Сразу оговорюсь, она платная, можете опробовать пробную версию, можете приобрести ее или просто спиратить – дело ваше.
Откройте True Image и войдите в раздел Инструменты и утилиты – Преобразовать резервную копию Acronis

Я использовал Acronis True Image 2013 с поставленным поверх русификатором, в других версиях расположение может быть другое, но в целом – эта функция присутствует.
Здесь вы выберите вашу копию системы, укажите путь куда должна будет отправиться преобразованная система. Если ваш слепок состоит из нескольких частей – не отчаивайтесь, укажите последнюю часть и программа подхватит все части, которые были до этого.
Вы получили образ в формате .vhd. Но его также нельзя использовать в вашей виртуальной машине. Теперь вам понадобится утилита StarWind V2V Image Converter, она бесплатна и скачать ее можно на официальном сайте.
Выберите место хранения вашего vhd образа и перекодируйте его в формат VMWare growable image (рекомендую). Процесс будет долгим, и скорость перекодировки будет зависеть от размера файла и мощности вашего компьютера.
И вот наконец то вы получили заветный образ .vmdk, теперь он один вне зависимости от того, сколько частей было изначально. Именно этот образ и будет в дальнейшем смонтирован в виртуальную машину.
Создайте новую виртуальную машину в VMware Workstation, выберите выборочную установку, укажите версию ОС, ОЗУ и ядер вы выделите для нее, не забудьте в меню выбора установки системы указать о том, что вы установите систему позже и то, что вы хотите выбрать существующий жесткий диск. (смотрите скриншоты ниже) При указании существующего образа вам могут предложить переграбить образ в более новый формат, рекомендую не делать этого, поскольку не всегда после этого система остается работоспособной. Я использовал VMware Workstation 9.0 с русификатором.


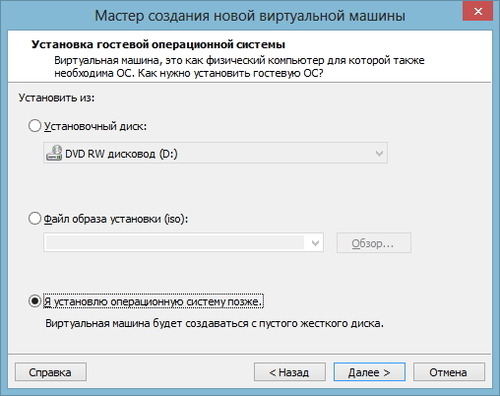

Теперь вы можете использовать виртуальную машину с системой, которую ранее сделали при помощи Acronis’a
Установка образа tib на виртуальную машину
Contents
As described in another post, I was looking for ways to install and run Windows 7, and various Windows programs, in a virtual machine (VM). Of course, creating a VM from scratch, and then installing and configuring a bunch of Windows programs in it, could take a substantial amount of time. Thus, it seemed that the most convenient method for creating a usable Windows system in a VM might be to simply restore one of those ATI 2011 TIBs into a new VM, or convert the TIB to some format that VM software could use.
It appeared that VMware, VirtualBox, and other VM software could use a file in VHD format. VHD also appeared to be the format that ATI 2011 and other tools would most readily convert drive image files into. (Apparently it was possible to create VMs from images created by AOMEI Backupper, by EaseUS Todo Backup, or by Macrium Reflect. Note also that, just as Acronis included a tool to mount and view the contents of its TIB images without restoring them, there were multiple tools to mount, read, and write to VHD files without actually running the VM contained in those files.)
Summary
In this relatively brief exploration, I found that it was possible to use ATI 2011 to convert a half-dozen TIB drive images of old Windows 7 installations to VHD, and to use those VHDs as the basis for VMs in VirtualBox.
I found, unfortunately, that the resulting VMs had problems. These VMs came from three different computers. The VMs from two of the three computers had Windows-related problems: they either failed to start at all, or they started but did not seem to be running software effectively. Perhaps some or all of those problems could have been resolved with sufficient troubleshooting effort. (I did not realize that the Hyper-V virtualization option built into Windows 10 used VHD format. When I added this later note, it seemed that Hyper-V might thus avoid the second conversion step, from VHD to a format compatible with VirtualBox, and might therefore be able to do a better job with these VHDs.)
The only two VMs that started and ran without obvious Windows-related problems were created from TIBs capturing the state of Windows 7 installations on a Lenovo ThinkPad E430 laptop manufactured in 2012. Possibly those two TIBs were most likely to work because the old laptop’s drivers were widely understood and/or because they were Lenovo-based: I had appreciated IBM’s quality since I bought my first PC, an IBM, in 1983, and I had seen it again in the OS/2 operating system in the 1990s.
While those two Lenovo-based VMs seemed to be running Windows successfully, VirtualBox did not allow them (and the other VMs that I was able to run) to run in properly sized windows. It would still have been possible to use them for some purposes, but plainly the little windows were not helpful. It was not clear when or if VirtualBox would be revised so as to eliminate that problem and make those VMs useful.
Since those Lenovo-based VMs did run successfully, without driver issues, it was possible that the TIBs from which they were created would also be most likely to succeed if I were to use restoration approach with them. That is, I might have been able to restore those TIBs into a previously created VM, and that might have avoided the problem of small windows. I did not explore that possibility.
Converting an Acronis TIB to VHD
This section of this post explores several methods of converting an Acronis TIB to a VHD file that VirtualBox might be able to use.
The last of the methods explored in this section did not require ATI to be installed: it would be sufficient to use ATI on a USB or other bootable disk to restore a TIB or other image to the computer, and then use VMware vCenter to virtualize that restored installation. My own needs did not call for further exploration of that method.
For my purposes, the TIB conversion options required ATI to be installed. To install ATI on a Windows 7 system, older versions like my ATI 2011 were good enough; for Windows 10 compatibility, ATI 2015 or later would be needed. At this point, I did not explore the question of whether ATI 2011 running in a Win7 VM on Win10 would provide the desired functionality, allowing me to convert TIBs even if I did not have ATI 2015+ or a physical Windows 7 system.
Creating a VHD via Disk Management on a Windows 7 Computer
A user named Bruno suggested a conversion approach that used the Disk Management (i.e., diskmgmt.msc) tool built into Windows. The general concept was that Disk Management was able to create an empty VHD (i.e., Virtual Hard Disk), which Windows would treat as a drive; my copy of ATI 2011 could restore an Acronis TIB drive image file into that VHD; and then VirtualBox could use that VHD as a VM. I tried the specific steps with a 28GB TIB image of a “nearly virgin” Windows 7 installation, created from a new computer shortly after I purchased it, when I had done little more than start it up and log in. In my interpretation, those steps were as follows:
Creating a VHD via Disk Management on a Windows 10 Computer
I was able to install ATI 2011 on my Windows 7 machine, so I could run ATI on that machine, and thus was able to follow all of the steps just described. But ATI 2011 was not compatible with Windows 10, so I could not install it on my Windows 10 machine. I was able to repeat the first several steps that I had taken on the Win7 machine; but when it came time to run ATI 2011, my only hope was to reboot the Win10 system from a bootable USB, CD, or DVD drive. (My preferred way of creating a bootable USB drive involved YUMI.)
When I booted the YUMI drive, I started by trying the option of running ATI 2011 Build 6942. I had just added that option to the YUMI drive. Unfortunately, it seemed this build was not able to recognize a USB mouse. I did have a PS/2 mouse, and the Win10 desktop computer did have a PS/2 jack, so I could have pursued that. But I doubted there would be any significant difference in functionality between two builds of the same Acronis product. Instead, I decided to try the older Build 5519, installed on the YUMI drive previously. That worked. In ATI 2011, I chose Recover My Disks > browse to and select the TIB > Next > select the drive C image > specify recover location. Unfortunately, that was the end of the line. There was no option to select any recovery destination other than the physical hard drive partition presently used as drive C by this system. I stepped back and looked in Tools & Utilities. Here, again, ATI 2011, booted from the USB drive, offered nothing of relevance.
I looked briefly at the Acronis WinPE ISO Builder option that was available to me as a Start Menu item on the Windows 7 machine. My impression was that this option was available to me only because I had bought and installed the ATI 2011 Plus Pack. Creating WinPE bootable media could be something of a hassle. Acronis said this media would offer various functions. It did not specify whether it would do TIB to VHD conversions.
Creating a VHD via ATI 2011 Conversion Option
On the Windows 7 computer, installation of ATI 2011 had created an option to convert an Acronis TIB to a Windows backup in VHD format. This option apparently existed in ATI 2010 as well. Subsequent versions of Acronis, right up to 2017, removed the conversion capability altogether. But then Acronis announced that ATI 2018 ($50 for perpetual use, free trial) was able, once again, to convert an Acronis image to VHD format. But Ghosh said the new ATI 2018 would only do this with full partitions. A search on that led to an Acronis explanation involving Microsoft Hyper-V, not VirtualBox, and a discussion suggesting that the resulting VHD might not be VirtualBox-compatible.
Creating a VHD by Virtualizing a Physical Installation
It was possible to take a snapshot of an ordinary Windows installation, on an actual computer, and use that snapshot to create a VM. To take that snapshot — that is, to virtualize that physical system, MakeUseOf (Yamada, 2017) recommended using Disk2VHD (or CloneVDI). TechGenix (Posey, 2016) offered some tips for making sure that such a process would produce a working VM. There were other possibilities. For instance, VMware’s vCenter Converter, another free option, would produce VMDK files. Normally, those would be intended for use in VMware Workstation, but it appeared that VirtualBox could use VMDKs. In my experience, as described in the previous post, VMware’s free vCenter Converter Standalone version 6.0 had successfully converted a simple Windows XP physical installation to VMDK format.
Other TIB to VM Converters
Identifying the Best TIB-to-VHD Conversion Approach
As described in the preceding section, I was able to use two different methods to convert an ATI TIB to a VM in VHD format. Now it was time to see whether those two VMs worked.
I started by downloading Oracle’s VirtualBox 5.2.6 (VirtualBox-5.2.6-120293-Win.exe), along with its Guest Additions and Extension Pack. The first step was to install it. When I double-clicked on VirtualBox-5.2.6-120293-Win.exe in the Windows 10 File Explorer, I got a message: “Windows protected your PC.” Apparently that was fairly unusual. I got past it by clicking “More info”: that brought up the “Run anyway” option.
The VirtualBox User Manual (§1.5) said that I could proceed to install the Extension Pack (Oracle_VM_VirtualBox_Extension_Pack-5.2.6.vbox-extpack), also by double-clicking. I tried that, but got an error: “Failed to open the Extension Pack.” The Details for that error said, “RTVfsFsStrmNext failed: VERR_TAR_BAD_CHKSUM_FIELD.” It seemed I might have downloaded a bad copy. I re-downloaded. This time, I got a slightly different file: Oracle_VM_VirtualBox_Extension_Pack-5.2.6-120293.vbox-extpack. This one ran OK. I think the bad one came from Softpedia, and the good one came from VirtualBox itself. Oracle’s instructions said the Guest Additions would be installed after I had an operating system (OS) in place, so I did nothing further with that for now.
The User Manual (§5.2) said that VirtualBox would normally use its own Virtual Disk Image (VDI) format — that this would be the format created when I created a new VM. But the Manual said VirtualBox also supported VMDK and VHD, along with the Parallels HDD format used on Apple machines. The manual recommended using dynamically allocated images, as they offered greater flexibility and their performance penalty would eventually be negligible. Elsewhere, the Manual (§1.14) indicated that VMs in OVF or OVA format could be imported and exported. I wasn’t sure what that meant to me.
At this point, I proceeded to create VMs, as described below. I would soon learn that this step was a bit premature. I should have gone, first, into VirtualBox > File Preferences > General tab > change Default Machine Folder to the desired drive or partition, so that VMs would be saved on a partition that had room for them. Instead, I had to fool with them later (below). Changing the Default Machine Folder would take care of the later option to modify Settings > General > Advanced tab > Snapshot Folder.
So now I created VMs. That started with a search, which led to a Datto article (Woellhof, 2017) which, with my own recollection from previous VirtualBox usage, advised me, in effect, to go into VirtualBox > New > Expert (not Guided) Mode. I created one VM for each of my newly created VHDs. I named the VM for the first one “Disk Management” and the second one “ATI Conversion,” to remind me of how I had created them. For both, the type was Microsoft Windows 7 (64-bit), because that’s what the original installation (backed up in the TIB) had been. The selection box was sneaky: if I changed other things in this dialog, sometimes it would eliminate the name or change the VM type. For each VM, on a host machine with 24GB RAM, I allocated 2048MB RAM and chose “Use an existing virtual hard drive file.” I clicked the folder icon, navigated to the correct VHD, and then clicked Create.
I did not intend to use either of these machines at this point, so I did not revise their Settings in VirtualBox. Later, I would decide that that, too, was a mistake: for each VM, I should have gone into Settings > Network > Adapter 1 > check Enable Network Adapter > set it to Not Attached > uncheck Enable Network Adapter (and likewise for Adapter 2 et seq.). I made that change because I did not yet want these VMs to connect with the Internet. They were old; I had no idea what updates (e.g., Windows, antivirus, other programs) should be installed, or might install themselves, or whether any of those updates (especially but not only from Microsoft) would alter the VM in ways that would make it less functional or more problematic. Once the VMs were created, to improve performance, on a system with spare resources, I also changed Settings > System > Processor tab > 2 CPUs (out of eight available) and Settings > Display > Screen > Video Memory > 128MB. In addition, I increased the RAM allocation to 8192MB.
I selected the first VM, clicked Start, and watched; and then I closed that one and tried the other. The first one, Disk Management, just gave me a blinking white cursor on a black screen (along with one or two VirtualBox notices about keyboard and/or mouse). A search led to various suggestions, but most seemed to pertain to VMs that had previously worked. I suspected that a failure to run at all meant that I had a dud. I was especially inclined to suspect that in light of the VHD’s size. As noted above, it was 27GB, which actually made it a bit smaller than the TIB from which it was created. I tended to use the next-to-highest compression setting in ATI 2011. I doubted such a highly compressed file would support a working VM. After all, in my previous exploration, a 61GB Windows 7 TIB resulted in a 118GB VHD. I concluded that, if it became necessary to make the Disk Management procedure succeed, I would start by redoing the VHD creation procedure, to see if I got a different result.
Trying Out the TIB-to-VHD VMs
While I was pleased, I was not yet convinced that I had arrived at a good method for converting TIBs to VirtualBox VMs. It was one thing for the ATI 2011 conversion process to succeed with a nearly virginal 28GB TIB. Now it was time to try it it with some larger TIBs, capturing more complex Windows 7 installations. I returned to ATI 2011 and used its conversion option on TIB images of mature Win7 systems from several different computers. This included the 61GB TIB (producing a 120GB VHD) that I had attempted in the previous post — the difference being that, this time, I was using ATI 2011 Build 6942 (above). I hoped that this (or other unknown factors) would produce success. Hope turned to joy as the 118GB monster VHD produced from that 61GB TIB did, in fact, boot within VirtualBox. It took several lifetimes to finish booting; we were indeed hoping for miracles from those speedup techniques. (To proceed on into the VM, once I got to the Windows 7 screen asking me to press Ctrl-Alt-Delete, I had to hit Host-Del. By default, Host was Right-Ctrl.) But in any event — especially after a retry, allowing me to increase the RAM allocated to the VM — it worked.
I was about to find that the same was true for VMs created from other old TIBs. This, however, was the point at which I realized I should have been creating these VMs on a different partition. To fix that, I ran a search and started to use advice by TechRepublic (Wallen, 2016), so as to move them. Then I decided it would be easier to delete them. For that, the search led to Geek University advice to use right-click > Remove > Delete all files. As promised, that deleted even the VHD, which would ordinarily not be desired. But I vaguely recalled bad experiences, previously, in terms of incomplete or otherwise screwed-up moves or deletions of VirtualBox VMs. I didn’t want to go there. So I went ahead and removed everything, and then restored the VHDs from backup and started over. They were large, so that took a while.
I took a preliminary look at each VM, one at a time, by selecting the VM and clicking Start. Each VM started successfully albeit slowly. For each VM, almost immediately after I entered my password at the Windows 7 login screen, I got a message: “You must restart your computer to apply these changes.” A search did not provide enlightenment. I suspected Windows was recognizing that it was no longer running on the machine where the TIB had been created, and was adjusting itself accordingly.
The VMs that were at least somewhat functional wanted me to go online to install or update antivirus, install Windows updates, reactivate Windows, and so forth. But I was interested in running a Windows 7 installation that was not in touch with the Internet precisely because, as described in the other post, over the past several years, I and others had observed that system problems seemed to increase when Microsoft felt it was time for us to spend more money or give Microsoft more control over our systems. I wanted to keep the VM offline. If there was no way to do that, then I would want to know that.
Some VMs immediately displayed problems that surely did not exist in the original system imaged by the TIB (because I wouldn’t have made an image backup of a troubled system). For example, the big 61GB TIB did not seem to want to run any of its installed software properly. Even an attempt to run a session of Windows Explorer resulted in a “Server execution failed” error. The Start menu did not seem to be functioning properly either. For instance, to run Excel in that VM, I had to use Start > Run > CMD, and then enter commands to navigate manually to where Excel.exe was located, and then type “Excel” on the command line. That got Excel to run; but then Microsoft Office immediately said that it, too, needed to be activated; and when I used the option to use it without activation for the time being, Excel would not accept keyboard input. Overall, that big VM was still very, very slow, even with Guest Additions installed. I decided that it would probably make more sense to start with a lean, clean VM, if at all possible, and add software to it as needed, rather than try to make that big, ugly thing work well.
Two well-developed VMs would not start at all. They would very rapidly flash a blue screen of death (BSOD) with STOP code 0x0000007B. (I was able to capture that information only by making the mouse active outside of the VM and then using PrintScreen when the BSOD appeared for only about one second.) Lifewire said that device driver issues would be one possible explanation for that error. Driver issues would be no surprise; after all, this was entirely different hardware, requiring entirely different drivers. It may have been possible to troubleshoot and resolve that issue. I was not presently inclined to do that; as just noted, I was more inclined to spend that time building a fresh, new VM.
I wound up with three VMs that were basically functional. For these, I reached the point of installing the VirtualBox Guest Additions to improve their performance. That led to a new problem — due, this time, to VirtualBox, not to Windows. As advised by the Manual, I achieved that installation by choosing VirtualBox menu (i.e., the top bar of a running VM window) > Devices > Insert Guest Additions CD image > Run VBoxWindowsAdditions.exe > use default options unless you have a better idea. Unfortunately, that seemed only to mount that virtual CD. In the running VM, I saw VBoxGuestAdditions.iso listed in VirtualBox menu > Machine > Settings > Storage > Storage Devices. But one source seemed to say the Guest Additions CD image could be mounted and yet might not be installed. That appeared to be my situation. There were several indications that the Guest Additions were not yet installed:
It appeared (according to 1 2 sources) that this failure to install might be due to a bug in Guest Additions. I tried several suggestions to obtain at least the ability to resize the VM window, so that it would be large enough to use for practical purposes. Those suggestions:
It tentatively appeared that this problem with Guest Additions and/or the inability to resize might arise specifically from these TIB-to-VHD VMs: I didn’t recall any such problem in my most recent uses of VirtualBox with VMs created in other ways.
The inability to resize rendered these VMs rather useless, at least until a solution appeared. Before setting them aside, however, I did want to verify their activation status. Control Panel > System confirmed that all of them needed to be reactivated.